I finally finished the drapes! I have to say that I am very proud of myself. This is definitely the most difficult project completed to date. The tutorial I followed wasn't that tricky, but doing everything four times (made four panels) and trying to be precise was exhausting.
So, here is the before:
And, before you say anything: yes - the TV is in front of the windows. I know! This is totally a no-no. But honestly there is nowhere else to put it! OH WELL.
So anyway. After hanging the drapes, I couldn't just sit back and open a bottle of rose. Well, I did. But then I had to hem them, and then I had to train them. Apparently you must train your drapes to fall in nice folds by tying them up for a few days. Here is a pic of the drapes in training:
And did I mention that these are fully lined? Check it out:
Enough already! Here they are!!!!!!!!!!!!!!!!!!!!!!!!
I love them and sort of can't believe that I made them. But believe it!
Wednesday, April 27, 2011
Friday, April 22, 2011
Lamp Attack!
Everyone in my family has terrible eyesight. Like getting-glasses-in-second-grade terrible. Out of everyone, mine is the "best" and it is still the worst. Plus, I have "dry eyes" so wearing contact lenses was not fun. That being said, I had LASIK surgery in 2005 and it was awesome. However, I have noticed that my vision has started to deteriorate; I am having trouble both reading and seeing far-away things again.
Allllll that was lead up to this:
This is the ceiling fixture in the living room. I love it so! It is pretty! But it is not bright. I think some of the bulbs in it went out? But, for the life of me, I cannot figure out how to remove the glass so I am stuck squinting and straining my eyes to read in that room. Not really, but you know what I mean.
Anyhoodles, after I saw the Young House Lovers decide to put a low console table behind their grey L-shaped sofa (THEY ARE TOTALLY COPYING ME), I decided to copy them back and also put a table there. And! I can add lamps! So I've got that going for me.
Can you help me try to decide what lamps to get? I need a pair. My only concern is that I think the lamps need to be very low-profile because I am not moving my gallery wall. Uh uh.
Here are my top contenders:
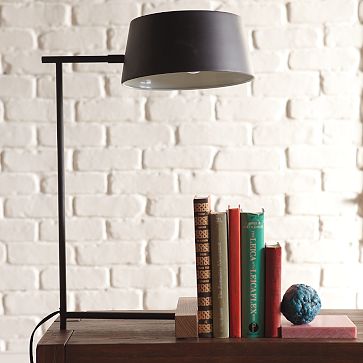
1. West Elm Loft Task Lamp
Pros: on sale! skinny! sort of industrial yet not too modern!
Cons: not sure I love it? maybe I do? I think I do!
2. Anthropologie Menlo Lamp
Pros: love! so cute! see through! only takes special bulbs!
Cons: expensive to get two. only takes special bulbs.
3. Kirkland Blue Table Lamp
Pros: cheap!
Cons: cheap! also boring?
Soooooo....what do you think:???????????????????
Allllll that was lead up to this:
This is the ceiling fixture in the living room. I love it so! It is pretty! But it is not bright. I think some of the bulbs in it went out? But, for the life of me, I cannot figure out how to remove the glass so I am stuck squinting and straining my eyes to read in that room. Not really, but you know what I mean.
Anyhoodles, after I saw the Young House Lovers decide to put a low console table behind their grey L-shaped sofa (THEY ARE TOTALLY COPYING ME), I decided to copy them back and also put a table there. And! I can add lamps! So I've got that going for me.
Can you help me try to decide what lamps to get? I need a pair. My only concern is that I think the lamps need to be very low-profile because I am not moving my gallery wall. Uh uh.
Here are my top contenders:
1. West Elm Loft Task Lamp
Pros: on sale! skinny! sort of industrial yet not too modern!
Cons: not sure I love it? maybe I do? I think I do!
2. Anthropologie Menlo Lamp
Pros: love! so cute! see through! only takes special bulbs!
Cons: expensive to get two. only takes special bulbs.
3. Kirkland Blue Table Lamp
Pros: cheap!
Cons: cheap! also boring?
Soooooo....what do you think:???????????????????
Thursday, April 21, 2011
Pick a Peck of Purple Piped Pillows
I made a cute crib-sized pillow to go with the yellow quilt -- and it's piped!!! Purple piping on a pillow is perfect.
It was easy -- I used pre-made piping from Joann's. Just stitch the piping onto one side of your fabric before you sew the pillow together. Easy peasy.
Cute!!!!
It was easy -- I used pre-made piping from Joann's. Just stitch the piping onto one side of your fabric before you sew the pillow together. Easy peasy.
Cute!!!!
Wednesday, April 20, 2011
Make Your Own Gallery Wall
The wall behind my sofa, which is the first wall you see when you enter the house, has been blank for a long time. At one point, I wanted a super giant painting there. I thought I found a gorgeous, oversized abstract painting at a thrift store near my house. I spotted it a while ago, and over time, in my mind, it became the perfect piece to put there. I remember that it was priced at $275 and was going to go back to the store and offer $200 cash. However, when I returned to the store and saw the painting again, I realized something. It was ugly! Totally, seriously ugly. And it wasn't an abstract, like I had thought. It was a very motel-lobby painting of the Golden Gate bridge on a foggy day. Yikes. Not this bad but almost:
My next thought was to have two large abstract-ish landscapes painted by a local artist I know (a.k.a. my dad). I think he is still working on these? It has been a loooong time. I guess he is busy? Who knows, he is a strange individual. Anyway, if they ever get finished, I can put them in another room.
Then I decided that the simplest thing to do would be to create a gallery wall. You know I had enough Ikea ribba frames to do this. I used art I had around, including four prints from 20x200. I filled out the arrangement with a plate and rectangular dish that were collecting dust in the china cabinet. I also added two random postcards as place holders - when I find something better (like maybe an oversized antique key or something interesting/lame like that) I'm going to remove the post cards. (Leave your address and I'll send one to you).
The hardest part of all this is making the arrangement. Here is how you do it:
1. Look at images of gallery walls online. Decide what style you want -- an orderly grid of matching frames, a grouping of similar frames, a mish-mash of thrift store randoms, etc. I decided that I wanted an arrangement that had an even outer perimeter, but was a mish-mash within those borders.
2. Using wrapping paper or newspaper, make templates of all your frames. Note which frames are to be hung horizontally or vertically.
3. Using blue painter's tape, tape them to the wall. Start with the biggest pieces -- for example, my largest frame gave me the height of my project. Going from biggest to smallest made sense for me. This step took a while -- maybe 2 hours? I took a lot of breaks.
Here is what my arrangement looked like once I was happy with it:
4. One at a time, hang each piece. Leave the paper up and put the nails right through it. When all the nails are in, rip out the paper and hang the frames. You may have to make adjustments -- I moved a few pieces and leveled out some others.
5. Enjoy! Here is my finished gallery wall:
Don't you feel just like you are in a gallery, looking at a wall????
Tuesday, April 19, 2011
Complicated Project Alert!
I told you I have a lot of baby friends! My cutest baby friend, Charlie, needs a quilt for her room ASAP. Her room has turquoise/Tiffany blue walls and pink bedding. In fact, it looks exactly like this, except she is a baby so there is a crib instead of a bed. But you get the idea. I may have helped decorate this room.
ANYHOO, in my mind, I wanted to make a quilt that sort of used the paper doll motif of the bedding, but was also not too "country" because this baby's mama hates anything that is vaguely "country" or "shabby chic" or "olde fashioned." I guess her style is Manly/Modern/Retro? Sort of like Don Draper but in furniture form?
So ANYHOO Part 2, I found some perfect fabric in the Penny Lane collection, but I wasn't sure what to do with it. Patchwork squares would not cut it. Here is part of the fabric bundle I ordered (you need a surprisingly large amount just to make a crib quilt):
Then I saw this quilt pattern - which is for making a manly quilt full of ties and brown colors:
And I decided that I would get this pattern but change all the ties into paper dolls, change all the colors and change the border to be less quaint. So, that's where I am. I have a bunch of pink and blue fabric and a pattern for brown ties. Can't wait to see where this ends!
ANYHOO, in my mind, I wanted to make a quilt that sort of used the paper doll motif of the bedding, but was also not too "country" because this baby's mama hates anything that is vaguely "country" or "shabby chic" or "olde fashioned." I guess her style is Manly/Modern/Retro? Sort of like Don Draper but in furniture form?
So ANYHOO Part 2, I found some perfect fabric in the Penny Lane collection, but I wasn't sure what to do with it. Patchwork squares would not cut it. Here is part of the fabric bundle I ordered (you need a surprisingly large amount just to make a crib quilt):
Then I saw this quilt pattern - which is for making a manly quilt full of ties and brown colors:
And I decided that I would get this pattern but change all the ties into paper dolls, change all the colors and change the border to be less quaint. So, that's where I am. I have a bunch of pink and blue fabric and a pattern for brown ties. Can't wait to see where this ends!
Monday, April 18, 2011
Fabric Madness
I keep buying fabric! I got this at Joann's. I don't know what to do with it, but I liked the colors and the seaweed-like pattern.
AND I was just filled in on this place called Rosie's Calico Cupboard here in San Diego. Apparently it is THE Place To Go for fabric in all of SoCal! Where the elite meet, etc. I haven't gone yet. I'm scared! It's a Happening Place!!!
Friday, April 15, 2011
Drapery Progress
I'm making progress on the drapes for the living room. I've completed the top seams, and am now going to add the lining (fancy!) and sides. Shouldn't be too difficult? I found a nice tutorial online and have been following it religiously!
I am a teensy bit worried that they will be too *busy* ... but I really love the colors and am going to wait and see what they look like once they are up.
I'm also a tad worried about the hanging process.... four lined drapes are HEAVY! Much heavier than the current sheers. I think I will have to re-install the drapery hardware to make sure it is really secure.
Another worry - I'm definitely going to need new sofa pillows! But that is a fun worry. I'm thinking ikat???
We'll see...
I am a teensy bit worried that they will be too *busy* ... but I really love the colors and am going to wait and see what they look like once they are up.
I'm also a tad worried about the hanging process.... four lined drapes are HEAVY! Much heavier than the current sheers. I think I will have to re-install the drapery hardware to make sure it is really secure.
Another worry - I'm definitely going to need new sofa pillows! But that is a fun worry. I'm thinking ikat???
We'll see...
Subscribe to:
Posts (Atom)